
Thursday, 27 June 2013
BlackShot Waller (New Released From VIP)
Hello Guys!
Today I Want Share You About BlackShot Hack !
I Bought It From The MPGH.Net Hacks
Finally It's Works!
Ok,Here The Link
Click Here To Download = )
Here Some Pictures To See If This Working Or Not = )


At The Menu Of Hacks!

Hope You Enjoy With This Hacks!
Oh,I Forgot For The Links,You Must Have A User For The MPGH.Net Account
Today I Want Share You About BlackShot Hack !
I Bought It From The MPGH.Net Hacks
Finally It's Works!
Ok,Here The Link
Click Here To Download = )
Here Some Pictures To See If This Working Or Not = )
At The Menu Of Hacks!
Hope You Enjoy With This Hacks!
Oh,I Forgot For The Links,You Must Have A User For The MPGH.Net Account
Monday, 3 June 2013
How to record Angry Birds
This Angry Birds video is uploaded by Bandicam user.
Information:
- Title: Angry Birds #1 - 2 Golden Eggs
- Uploaded by TheUltimateCobra on Oct 28, 2011
- Video Source (YouTube): http://www.youtube.com/watch?v=J0zC5cclEEw
- Description: How To Get 2 Golden Eggs On Angry Birds Also How To Beat Levels 8,9 & 10.
Bandicam offers the best online game recording experience.
When you record online games with Bandicam Game Recorder:
- You can upload the recording file to YouTube directly (without converting)
- You can record over 7 days without stopping (AVI 2.0 OpenDML)
- The recorded file size is smaller (1/5~1/20) than other capture programs.
- It has less lag than other capture programs (Bandicam uses much lower CPU usage).
How to Record Angry Birds Gameplay
To record flash games like the Angry Birds, you have to use 'Rectangle on a screen' mode of Bandicam. Please, follow the steps below to record Angry Birds gameplay.
1. Click the 'Target' button, and choose the 'Rectangle on a screen'.
- Rectangle window will pop up, and you can move and resize the rectangle window.

2. Click the ' ● REC ' button or click the 'F12' function key to record.

3. To stop recording, click the 'Stop (■)' button (Hotkey F12).
4. To watch the recording file, click the 'Open' button under the 'General' tab of the Bandicam.

5. To close the 'Rectangle window', choose 'DirectX/OpenGL window' mode

More information
- Angry Birds (Wikipedia): http://en.wikipedia.org/wiki/Angry_Birds
- User Gameplay Video (YouTube): Waiting your video.
» Send your video link to nukmanfaiqpro12345@gmail.com, we will post it here.
How to record Counter-Strike - CS, Counter Strike Online
This Counter-Strike video is uploaded by Cruzshinima (Bandicam user).
Information:
- Title: Bandicam Test On Counter Strike Source [HD]
- Uploaded by Cruzshinima on Apr 22, 2011
- Comment: It's basically me testing bandicam recorder on Counter Strike Source
Counter-Strike Online Recording Sample Video
Information:
- Title: Bandicam CSO iAH Test DG
- Uploaded by GarryFam on Nov 30, 2011
- Comment: 70Q 25fps 150mb
Bandicam offers the best online game recording experience.
When you record online games with Bandicam Game Recorder:
- You can upload the recording file to YouTube directly (without converting)
- You can record over 7 days without stopping (AVI 2.0 OpenDML)
- The recorded file size is smaller (1/5~1/20) than other capture programs.
- It has less lag than other capture programs (Bandicam uses much lower CPU usage).
How to Record Counter-Strike Gameplay
Please, follow the steps below to record Counter-Strike game.
1. Click the 'Target' button, and check the 'DirectX/OpenGL window'.
- It's better to use the 'DirectX/OpenGL window' mode to get the high quality video file
2. Start Counter-Strike game to record.
- Note: For stable operation, Bandicam needs to be run before Counter-Strike game
3. While running a game by DirectX/OpenGL mode, you can see the green-colored number on the screen.
- You can control FPS (Frames per second) under the 'FPS' tab of the Bandicam
- Note: Only when the target is produced in the 'DirectX/OpenGL' window, the green-colored number (FPS) will be shown. If you can't see the green-colored number, click HERE

4. Click the 'F12' function key (or the 'Record' button on Bandicam) to start recording.

5. During recording, the green-colored number (FPS) will be changed to red.

6. To stop recording, click the 'F12' function key (or the 'Record' button on Bandicam) again.

7. To watch the recording file, click the 'Open' button under the 'General' tab of the Bandicam.
Counter-Strike Game Recording for advanced users
1. To minimize the computer lag, reduce the "Video Resolution/Size/FPS/Quality"
See http://www.bandicam.com/faqs/how_to_reduce_lag_when_recording/2. To make 1080p/720p/480p/360p video for YouTube, change the video format settings
See http://www.bandicam.com/faqs/how_to_make_1080p_youtube_videos/3. To edit the recorded video, use 'For Edit Premiere/Sony Vegas' preset
See http://www.bandicam.com/faqs/how_to_edit_recorded_streaming_video/4. To use Mouse Click Effects, check the "Add mouse click effects" option
- If this option is checked, the recorded video will have the mouse click effects/animation.
More information
- Counter-Strike (Wikipedia): http://en.wikipedia.org/wiki/Counter-Strike
- Counter-Strike Online (Wikipedia): http://en.wikipedia.org/wiki/Counter-Strike_Online
- User Gameplay Video (YouTube): Waiting your video.
» Send your video link to nukmanfaiqpro12345@gmail.com, we will post it here.
How to record the computer screen
Bandicam can record everything on your computer screen and save it as video files (*.avi) or image files (BMP, PNG, JPG). To record your computer screen, choose 'Rectangle on a screen' mode of Bandicam.
Try the free version of Bandicam, the best screen recorder!
Try the free version of Bandicam, the best screen recorder!


How to record full screen with Bandicam
Bandicam can record everything on your computer screen and save it as an AVI file. To capture full screen activity, please see the steps below:
- Click the 'Target' button of Bandicam
- Choose the 'Rectangle on a screen' mode
- Click the 'Full Screen' image button
- Click the ' ● REC' button to record/stop
» click here to see the full tutorial
How to record a specific screen area
Bandicam can record everything on your computer screen and save it as an AVI file. To capture a specified area on the computer screen, please see the steps below:
- Click the 'Target' button of Bandicam
- Choose the 'Rectangle on a screen' mode
- Move and resize the rectangle window
- Click the ' ● REC' button to record/stop
» click here to see the full tutorial
Image-capturing of games and streaming videos
Bandicam can take a screenshot on your computer screen and save it as an image file (JPG, PNG, BMP). To take a screenshot on the computer screen, please see the steps below:
- Click the 'Target' button of Bandicam
- Choose the 'Rectangle on a screen' mode
- Move and resize the rectangle window
- Click the ' Camera ' image button
How to record the computer screen and audio (Sound, Voice, Microphone)
Bandicam can record the computer screen with sound (audio, voice, microphone).
- If you can't record the computer screen with sound,
» click here! - If you can't record the computer screen with voice/microphone,
» click here! - If you can't record the computer sound and voice/microphone at the same time, » click here!
How to capture mouse cursor (pointer)
Bandicam can record the computer screen with the mouse cursor (pointer).
- To capture the computer screen with the mouse cursor, go to "Video" tab and uncheck the "Hide mouse cursor" option.
- To capture the computer screen with the mouse cursor, go to "Image" tab and uncheck the "Hide mouse cursor" option.
Fraps New Version Crack

Hello Guys!
Nice To Meet You!
Harini Admin Nak Share Skit Fraps Full Version Punye!
Mesti Seronok Dengar Kan??Okey,Admin Jumpe Benda Nih Melalui TPB
..Waahh,,Download Is Good!!Sharing Is Caring..Wallaweeiii~~~
..Waahh,,Download Is Good!!Sharing Is Caring..Wallaweeiii~~~
Seronok Seyh Admin Harini..
Fungsi:
-Merakam Game Dengan Kualiti Yang Tinggi
-Walaupun Sizenya Agak Besar,Tapi Kualitinya Berkualiti Berbanding Bandicam
Yang Bersaiz Rendah Tetapi Agak Kabur Sedikit
-Sesuai Untuk Penggunaan Gamers
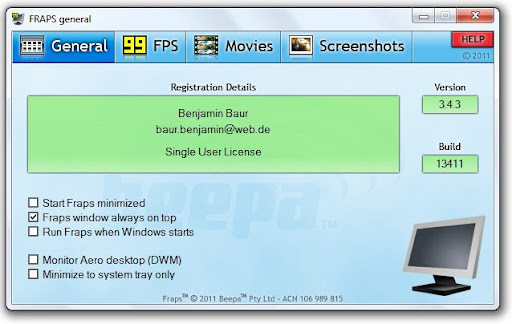
Okey Tak??Time Gne Macam Gambar Kat Bawah Nih

Clear Tak Gambar?
Link Download Kat Bawah
4Shared.com-http://adf.ly/Py4mp
Password-CyberHackers
Password-CyberHackers
Oky,Setakat Tu Jer Yang Admin Mampu Buat.Terima Kasih Sebab Menyokong Dan Melayari Blog Admin Nih!Bye!
Saturday, 1 June 2013
* Optimizing Tixati *
Tixati works well with the default settings, but there are a few things every user should do to make sure they are getting the fastest download speeds possible.
The following instructions are provided as a general guide for all users. Because internet connection speeds and latency can vary greatly, you should feel free to experiment with the settings to find what works best for you.
Step 1: Set Your Outgoing Bandwidth Throttle
On some internet connections, especially DSL and Cable modems, too much outgoing traffic can choke off all traffic and will effect your download speed. Tixati features both incoming and outgoing bandwidth throttles. It is generally not necessary to set the incoming bandwidth throttle, but all users should set the outgoing throttle to prevent too much outgoing traffic from slowing your downloads.
Most users will get the best results with the outgoing bandwidth throttle set to about 70-80% of total capacity, which can vary greatly depending on how fast your internet service is.
How To Figure Out Your Outgoing Bandwidth Capacity
If you already know what your outgoing bandwidth capacity is, you can skip this step.
There are a few ways to figure out how fast your internet connection is in terms of outgoing bandwidth. One of the quickest and easiest ways is to use an online speed test.
There are many online speed tests, but some will only tell you your incoming speed and will not test your outgoing speed. One that gives you both incoming and outgoing is on http://speedtest.net , and there is also another decent one on http://www.dslreports.com/stest .
Once you've completed the test, you will see results that look something like this:


Make sure you are looking at Upload speed. These speed tests give results in different units, such as Mb/s and Kb/s.
Note the difference between upper-case "B" and lower-case "b" when you are working with units. Upper-case means bytes, lower-case means bits. There are 8 bits in a byte.
You will need to convert your results into kilobytes per second (KB/s) according to the following table:
From the results in our examples, we know our internet connection has an 80 KB/s (kilobytes per second) outgoing capacity.
It is usually best to set your outgoing throttle at about 70-80% of capacity. Since our capacity is 80 KB/s, we will set our throttle to 80 x 0.7, which equals 56 KB/s.
How To Set Your Outgoing Bandwidth Throttle
To set the outgoing throttle in Tixati, first click the 'Bandwidth' button at the top of the main window. This will switch to the Bandwidth view where the throttle controls are:

(click this image for a sharper full-size picture)
Once we have switched to the Bandwidth view, we activate the 'Maximum' checkbox in the lower (outgoing) area, and type our desired limit of 56 into the box underneath and press ENTER, as shown by the green arrow.
You may want to experiment with raising or lowering the throttle when you are running many transfers to see what is the best setting. If you set it too low, your downloading rate might suffer because you are not uploading enough for other peers to reciprocate. If you set it too high, it may choke your Cable/DSL modem and impact your downloading rate. You can usually tell it is too high if the bandwidth chart is jagged, like on the left side of the above picture.
Step 2: Make sure you can receive incoming connections
In any peer-to-peer system it is important to be able to receive incoming TCP connections from other peers. Without this ability, a peer can only place outgoing connections and becomes isolated from other peers that also can't receive incoming connections.
In many swarms, it is typical for nearly half of the peers to not be able to receive incoming connections. This means if you are one of these peers, you are missing out on downloading from many other peers with your same situation. If you could receive incoming connections, these peers could connect to you and provide you with a faster transfer.
How do I know whether I can receive incoming connections?
It is easy to tell if you are unable to receive incoming connections. First, get a few downloads going. Make sure they are healthy swarms with plenty of other peers.
After about five minutes, look at the bottom of the main window:

If you see "0 Incoming Connections Received" like in the picture, you haven't received any incoming connections and you probably have a firewall and/or broadband router that is preventing this.
If you don't see "0 Incoming Connections Received", you have been receiving incoming connections, and you can skip this entire section.
Why can't I receive incoming connections?
There can be many reasons for this, but generally it is because of a network firewall built into your operating system, or because you are using a broadband router.
First, determine what TCP port number Tixati is configured to use for incoming connections. Click the 'Settings' button at the top of the main window. The Settings window will appear. Click "Network > Incoming Ports" in the list along the left side. You should see something like this:

(click this image for a sharper full-size version)
Notice the incoming TCP connection port #. Make a note of this number.
Please consult the following guides to make sure your firewall and/or broadband router is configured to allow incoming connections on your TCP port:
Opening Ports in the Windows 7 Firewall
Opening Ports in the Windows Vista Firewall
Opening Ports in the Windows XP Firewall
Opening Ports in the Linux Firewall
Forwarding Ports in a Broadband Router
Step 3: Make sure DHT can receive incoming UDP packets
DHT is an alternative to traditional http torrent trackers, and can help you find more peers, especially if a tracker is unreliable.
DHT needs to receive incoming UDP packets from the internet to work optimally. This may be prevented by a firewall in your operating system, or by a broadband router you are using.
How do I know if I am receiving UDP packets for DHT?
First, make sure DHT is running. At the top of the Tixati main window, click the 'DHT' button to switch to the DHT view. If you see the word 'Stopped' in red in the status area, click the 'Start' button, as shown in the following picture:

(click this image for a sharper full-size version)
If your DHT status looks like this:

it means you should start a few downloads before continuing. DHT gets it's initial list of other DHT peers from active file transfers within Tixati. Once you start a few downloads, the DHT will gather some IPs to build up it's table. Once the DHT table is built up, it will be saved between sessions for quicker startup without the need to gather IPs from file transfers.
After DHT has been running for a few minutes, check the status again.
If your DHT status looks like this:

it means you are receiving incoming DHT packets and you can skip the rest of this section.
If after 5 minutes your DHT status still looks like this:

it means you are unable to receive incoming DHT packets and you will need to configure your firewall and/or broadband router to open an incoming UDP port.
First, determine what UDP port number Tixati is using for DHT messages. Click the 'Settings' button at the top of the main window. The Settings window will appear. Click "Network > Incoming Ports" in the list along the left side. You should see something like this:

(click this image for a sharper full-size version)
Notice the UDP port # for DHT. Make a note of this number.
Please consult the following guides to make sure your firewall and/or broadband router are configured to allow incoming UDP packets on your Tixati UDP port:
Opening Ports in the Windows 7 Firewall
Opening Ports in the Windows Vista Firewall
Opening Ports in the Windows XP Firewall
Opening Ports in the Linux Firewall
Forwarding Ports in a Broadband Router
Conclusion
Hopefully this guide has helped you configure Tixati for optimal performance. While the steps in this guide are not fully necessary to download and upload, they should help you get the fastest possible speeds. If you have any questions or comments, please feel free to use our Support & Feedback page to drop us a note.
Click here to return to the Tixati.com home page.
Click here to download Tixati.
The following instructions are provided as a general guide for all users. Because internet connection speeds and latency can vary greatly, you should feel free to experiment with the settings to find what works best for you.
Step 1: Set Your Outgoing Bandwidth Throttle
On some internet connections, especially DSL and Cable modems, too much outgoing traffic can choke off all traffic and will effect your download speed. Tixati features both incoming and outgoing bandwidth throttles. It is generally not necessary to set the incoming bandwidth throttle, but all users should set the outgoing throttle to prevent too much outgoing traffic from slowing your downloads.
Most users will get the best results with the outgoing bandwidth throttle set to about 70-80% of total capacity, which can vary greatly depending on how fast your internet service is.
How To Figure Out Your Outgoing Bandwidth Capacity
If you already know what your outgoing bandwidth capacity is, you can skip this step.
There are a few ways to figure out how fast your internet connection is in terms of outgoing bandwidth. One of the quickest and easiest ways is to use an online speed test.
There are many online speed tests, but some will only tell you your incoming speed and will not test your outgoing speed. One that gives you both incoming and outgoing is on http://speedtest.net , and there is also another decent one on http://www.dslreports.com/stest .
Once you've completed the test, you will see results that look something like this:
Make sure you are looking at Upload speed. These speed tests give results in different units, such as Mb/s and Kb/s.
Note the difference between upper-case "B" and lower-case "b" when you are working with units. Upper-case means bytes, lower-case means bits. There are 8 bits in a byte.
You will need to convert your results into kilobytes per second (KB/s) according to the following table:
| Kb/s (kilobits per second) | divide by 8 | example: 628 Kb/s divided by 8 = 78.5 KB/s |
| Mb/s (megabits per second) | multiply by 125 | example: 0.64 Mb/s x 125 = 80 KB/s |
| MB/s (megabytes per second) | multiply by 1,000 |
From the results in our examples, we know our internet connection has an 80 KB/s (kilobytes per second) outgoing capacity.
It is usually best to set your outgoing throttle at about 70-80% of capacity. Since our capacity is 80 KB/s, we will set our throttle to 80 x 0.7, which equals 56 KB/s.
How To Set Your Outgoing Bandwidth Throttle
To set the outgoing throttle in Tixati, first click the 'Bandwidth' button at the top of the main window. This will switch to the Bandwidth view where the throttle controls are:
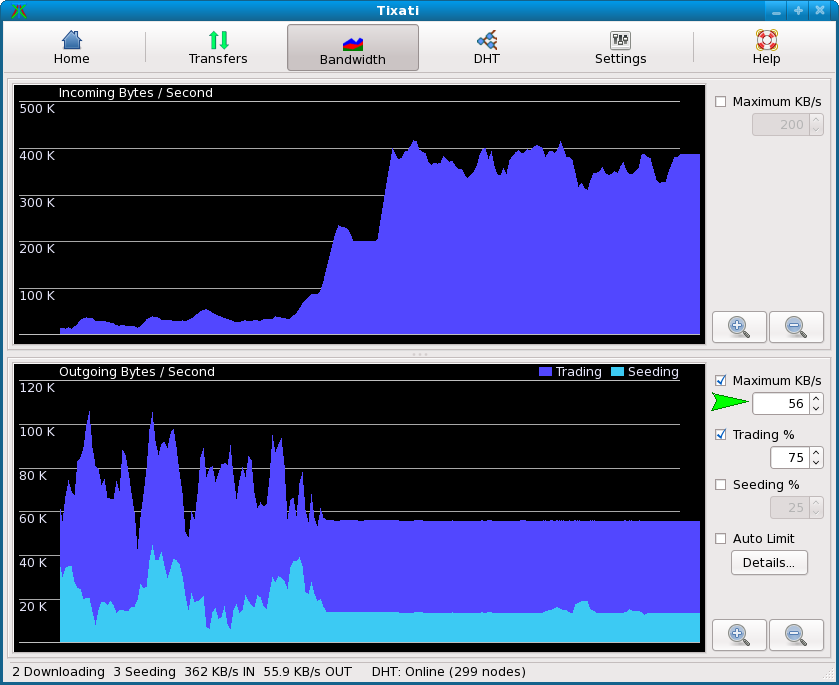
(click this image for a sharper full-size picture)
Once we have switched to the Bandwidth view, we activate the 'Maximum' checkbox in the lower (outgoing) area, and type our desired limit of 56 into the box underneath and press ENTER, as shown by the green arrow.
You may want to experiment with raising or lowering the throttle when you are running many transfers to see what is the best setting. If you set it too low, your downloading rate might suffer because you are not uploading enough for other peers to reciprocate. If you set it too high, it may choke your Cable/DSL modem and impact your downloading rate. You can usually tell it is too high if the bandwidth chart is jagged, like on the left side of the above picture.
Step 2: Make sure you can receive incoming connections
In any peer-to-peer system it is important to be able to receive incoming TCP connections from other peers. Without this ability, a peer can only place outgoing connections and becomes isolated from other peers that also can't receive incoming connections.
In many swarms, it is typical for nearly half of the peers to not be able to receive incoming connections. This means if you are one of these peers, you are missing out on downloading from many other peers with your same situation. If you could receive incoming connections, these peers could connect to you and provide you with a faster transfer.
How do I know whether I can receive incoming connections?
It is easy to tell if you are unable to receive incoming connections. First, get a few downloads going. Make sure they are healthy swarms with plenty of other peers.
After about five minutes, look at the bottom of the main window:
If you see "0 Incoming Connections Received" like in the picture, you haven't received any incoming connections and you probably have a firewall and/or broadband router that is preventing this.
If you don't see "0 Incoming Connections Received", you have been receiving incoming connections, and you can skip this entire section.
Why can't I receive incoming connections?
There can be many reasons for this, but generally it is because of a network firewall built into your operating system, or because you are using a broadband router.
First, determine what TCP port number Tixati is configured to use for incoming connections. Click the 'Settings' button at the top of the main window. The Settings window will appear. Click "Network > Incoming Ports" in the list along the left side. You should see something like this:
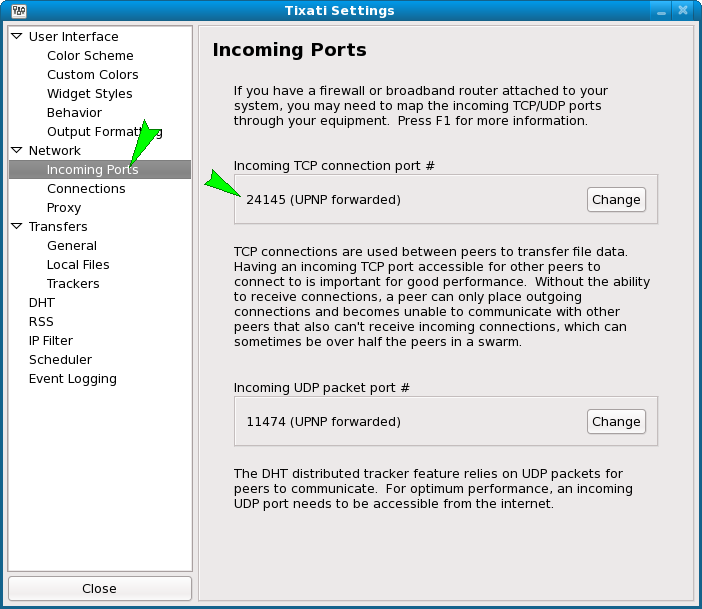
(click this image for a sharper full-size version)
Notice the incoming TCP connection port #. Make a note of this number.
Please consult the following guides to make sure your firewall and/or broadband router is configured to allow incoming connections on your TCP port:
Opening Ports in the Windows 7 Firewall
Opening Ports in the Windows Vista Firewall
Opening Ports in the Windows XP Firewall
Opening Ports in the Linux Firewall
Forwarding Ports in a Broadband Router
Step 3: Make sure DHT can receive incoming UDP packets
DHT is an alternative to traditional http torrent trackers, and can help you find more peers, especially if a tracker is unreliable.
DHT needs to receive incoming UDP packets from the internet to work optimally. This may be prevented by a firewall in your operating system, or by a broadband router you are using.
How do I know if I am receiving UDP packets for DHT?
First, make sure DHT is running. At the top of the Tixati main window, click the 'DHT' button to switch to the DHT view. If you see the word 'Stopped' in red in the status area, click the 'Start' button, as shown in the following picture:

(click this image for a sharper full-size version)
If your DHT status looks like this:
it means you should start a few downloads before continuing. DHT gets it's initial list of other DHT peers from active file transfers within Tixati. Once you start a few downloads, the DHT will gather some IPs to build up it's table. Once the DHT table is built up, it will be saved between sessions for quicker startup without the need to gather IPs from file transfers.
After DHT has been running for a few minutes, check the status again.
If your DHT status looks like this:
it means you are receiving incoming DHT packets and you can skip the rest of this section.
If after 5 minutes your DHT status still looks like this:
it means you are unable to receive incoming DHT packets and you will need to configure your firewall and/or broadband router to open an incoming UDP port.
First, determine what UDP port number Tixati is using for DHT messages. Click the 'Settings' button at the top of the main window. The Settings window will appear. Click "Network > Incoming Ports" in the list along the left side. You should see something like this:
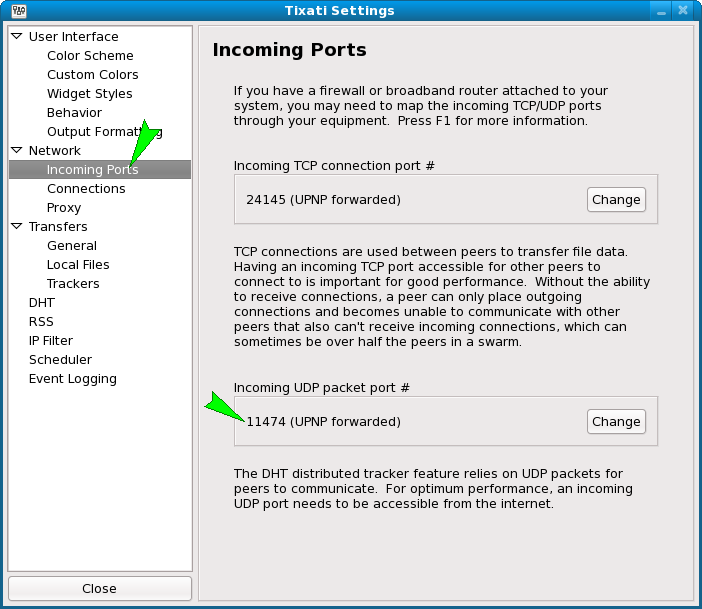
(click this image for a sharper full-size version)
Notice the UDP port # for DHT. Make a note of this number.
Please consult the following guides to make sure your firewall and/or broadband router are configured to allow incoming UDP packets on your Tixati UDP port:
Opening Ports in the Windows 7 Firewall
Opening Ports in the Windows Vista Firewall
Opening Ports in the Windows XP Firewall
Opening Ports in the Linux Firewall
Forwarding Ports in a Broadband Router
Conclusion
Hopefully this guide has helped you configure Tixati for optimal performance. While the steps in this guide are not fully necessary to download and upload, they should help you get the fastest possible speeds. If you have any questions or comments, please feel free to use our Support & Feedback page to drop us a note.
Click here to return to the Tixati.com home page.
Click here to download Tixati.
Subscribe to:
Comments (Atom)